|
No 9 Commando - A Brief History.
 This
is a brief account of the history of No 9 Commando from its formation in the
summer of 1940 to disbandment in 1946. It was most heavily involved in
operations around the coasts of Italy, Yugoslavia, Albania and Greece. This
is a brief account of the history of No 9 Commando from its formation in the
summer of 1940 to disbandment in 1946. It was most heavily involved in
operations around the coasts of Italy, Yugoslavia, Albania and Greece.
[Photo; the Commando Memorial, Spean Bridge, Scotland, courtesy of Stephen Eblet].
Background
On the
10th of May, 1940, Churchill replaced Chamberlain as
Prime Minister and almost immediately was faced with the evacuation of 330,000
troops of the expeditionary force from Dunkirk. On June 4th, as the last of the
troops were on the way home, Churchill sent a memo to his Chiefs of Staff that
would lead to the formation of the Commandos and the Combined Operations
Command. While everyone else was planning the defence of the country against an
invasion, the Combined Operations Command would
concentrate on planning for and undertaking offensive
operations.
'The completely defensive habit of mind, which has ruined the French, must not be allowed to ruin all our
initiative. It is of the highest consequence to keep the largest numbers of German forces all along the coasts of the countries that have been
conquered, and we should immediately set to work to organise raiding forces on these coasts where the populations are friendly. Such forces might
be composed by self-contained, thoroughly equipped units of say 1,000 up to not less than 10,000 when combined.'
Two days later he elaborated:
Enterprises must be prepared with specially trained troops of the hunter class, who can develop a reign
of terror first of all on the 'butcher and bolt' policy. I look to the Chiefs of Staff to propose me measures for a vigorous,
enterprising and ceaseless offensive against the whole German occupied coastline.
In response
to Churchill's urgent requests, on June 14, 1940,
Lieutenant-General Alan Bourne was appointed by the Chiefs of Staff to the
new position of "Commander of
Raiding Operations on coasts in enemy occupation and Adviser to the Chiefs of
Staff on Combined Operations." Bourne was a well
respected and capable Royal Marine Commander with
experience of both land and sea operations but, on learning
of his appointment, Churchill wanted a person of much greater stature and
experience. At his behest, on the 17th of July,
1940,
Roger
Keyes replaced Bourne and was appointed
to the strengthened position, certainly as viewed by Keyes himself,
of Director of Combined Operations.
Meantime, independent Commando units
had been formed, which undertook
courageous but largely inconsequential raids on Boulogne
and the Channel Islands. Churchill was not impressed with these pin-prick raids
and over several months their
recruitment, training and deployment were
better defined and developed. These
deliberations resulted in the formation of Commando Units in the first few weeks of July, 1940.
Some of the
Units had a distinct
geographical base as Army volunteers came forward. Nos 3 and 4 Commandos were
formed from Southern Command, Nos 5 and 6 from Western Command, No 7 from
Eastern Command, No 8 mainly from the London District and the Household
Division and Nos 9 and 11 from Scottish Command. No 1 Commando was formed from
disbanded Independent Companies, whose members were trained to fight
independently as irregulars and not as part of a formed military unit. Initially designated the No 1 SS Battalion by March 1941, it was renamed No 1 Commando.
Their CO was
Lt Col John Maclean (Jack) Saegert, RE
and their HQ was at Criccieth in North Wale.
Unless otherwise stated SS in this article denotes 'Special Service,' not
to be confused with the
German SS.
The
Canary Islands Alert
The months prior to the 1st Lofoten Islands raid in March of 1941
had been a frustrating time for the Commandos/Special Services. They had been
encouraged to volunteer for hazardous duties by the military authorities but
were left with little to do. There was even disagreement about how these forces
should be organised and deployed. Morale was understandably at a low ebb and
although this raid was virtually unopposed, it demonstrated what could be
achieved by a relatively small, well trained unit, with the element of surprise.
The success of the raid was a fillip to morale but some Commandos were
disappointed that the hazardous duties they had volunteered and trained for, had
not been utilised on this operation
In July,
the possibility of Spain entering the war on the side of the Axis
powers was a growing concern. Contingency planning for
the invasion of the Canary Islands was implemented with the
purpose of denying the enemy a naval base from which they could threaten Allied
shipping in the Atlantic approaches to the Mediterranean. The operation was
codenamed 'Puma', later
changed to 'Pilgrim'.
The force comprised two Royal Marine Brigades, Army
troops and Commandos. They were assembled at Inveraray under Major General
Robert Sturges of the Royal Marines. The Commando element comprised Nos 1, 2, 4, 9 &
12. Command of Force 110, as it became known, was transferred to Lt General, Sir
Harold Alexander the GOC of Southern Command.
Part of the force was sent
to Freetown in Sierra Leone and then Lagos
in Nigeria to undergo amphibious training in topographical and climatic conditions
similar to the Canary Islands. The Commando contribution to the
Force comprised four small parties of one officer and 25 other ranks,
including one drawn from No 9 Commando. However, by
February 1942 the risk had subsided and they returned to the
UK.
French Coast
On the night of November 22/3,
1941, under the codename 'Operation
Sunstar', a troop of 100 men from
9 Commando set out to attack a 4
gun emplacement east of Houlgate on the French coast south of Le Havre. They
came ashore a few hundred metres from their intended landing beach and were
unable to press home their attack because of an intervening clay cliff. Pte J
Davidson, a bren gunner in the cover party, who stayed aboard the 2 LCAs involved,
recalled that the troop had stayed aboard the Princess Beatrix for a couple of weeks
before the mission. They were issued with 1000 French francs
and escape rations.
As the LCAs beached, one
'broached to' (sideways on to the
beach) and was towed off with difficulty. Initially,
there was no sign of the enemy but soon Very
lights and search lights lit up the area, while trucks
were seen approaching from 3 or 4 miles
away. The raiders still on the beach
swam towards their LCA after exchanging torch signals
with the cover party. The LCA gunners withheld fire to avoid
giving away
their position.
Meantime another Commando
party, having called at a farmhouse to be told of an
imminent 2 man bicycle patrol, set a rope across the road to dismount them.
No sooner had this been done when a Stuka aircraft attacked the LCAs,
by which time Pte Davidson's
LCA was filling up with water and only one engine
was working. However, on the second strafing
he managed to put two bursts into the plane. It did not return and may have been
disabled or shot down.
This version of events differs from
some records of the operation which report a
successful landing and that the raiders had insufficient time to carry out the
intended raid. The Commandos
suffered no casualties but the raid proved the need for better planning and
execution.
Mediterranean [ Gibralter, Italy, Albania, Yugoslavia,
Greece].
Early in November 1942,
No 9 Commando, under Lt Col Ronnie Todd, was on the periphery
of Operation Torch when they were sent to Gibraltar to reinforce the
garrison there. There was concern that the Axis forces might move through Spain
in retaliation for the Allied invasion of North Africa. The Commandos returned
to the UK in early March 1943 to be replaced by No 3 Commando.
 Italy Italy
In the autumn of 1943,
No 9 Commando was despatched to the Mediterranean to be
joined by No 43 (RM) Commando
in Nov, 1943, after they had completed their
training.
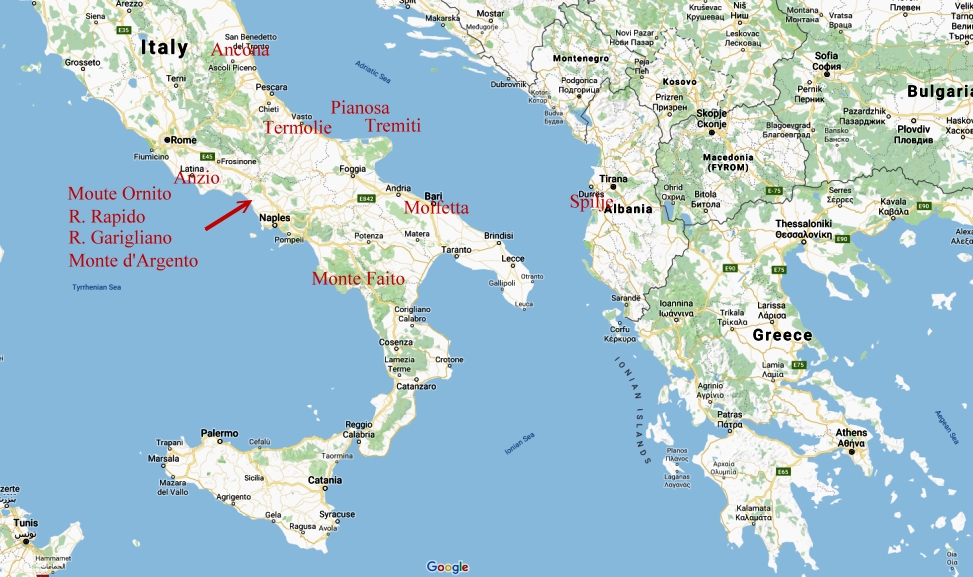
No 9 had been operating around Molfetta on the east coast of Italy since November 8. A week
later they carried out reconnaissance on the small islands of Tremiti and
Pianosa to the north but found no evidence of the enemy on
either.
[Map showing approximate
positions. Courtesy of Google 2019].
At the end of November,
they moved to Naples on the west coast of Italy,
coming under the command of the US Fifth Army. The Germans had
established a defensive line on the Garigliano and Rapido rivers. A plan to force a crossing of the Garigliano, near
its mouth, was abandoned in favour of a similar operation, but this time a feint,
designed
to keep the German forces occupied in the west.
Monte Argento
No 9 Commando were given three objectives by X
Corps: a hill called Monte d'Argento about 2000 yards NW of the river mouth; the destroyed bridge carrying
route 7 over the river and a spit of land NW of the river mouth, which separated
it from the coast. The three objectives formed a triangle and Lt Col R
J F Tod planned to land his
men half way along the shore side of the triangle then divide the force
into three, one for each objective. Since the operation was a feint,
they would withdraw across the river to their home bank once the positions had
been taken. Before the Commando action, the enemy positions on their home bank
were to be softened up and subdued.
They had a rehearsal on the night
of the 27/28 December, 1943 on their home bank
and on the evening of
the 29th, they embarked HMS Royal Ulsterman and Princess
Beatrice with their Landing
Craft Assault (LCAs) securely attached to davits for lowering the Commandos into
the water a few miles off the landing beach. On the 30th, they learned that most of the enemy had been
cleared by the 167 Brigade and the Guards Brigade. The task
ahead would now be quickly concluded.
About 6 miles south of the landing beach, opposite
friendly shores in Allied hands, the LCAs and the Commandos
were lowered into the water. They formed up and set
course for the landing beach, in darkness, at 21.30 hrs. Inaccurate navigation
by the accompanying US Navy craft would have placed the raiding party 2
miles SE of the river but Tod became aware of the error and advised his 2nd in command,
Major E W Clark. They altered course and landed about
700 metres NW of the river mouth at 0035 hrs. This was
about 1000 metres short of the intended
beach and 90 minutes later than planned. There were no distinguishing features
on the coastline, which was, in any event, difficult
to see.
One LCA developed a steering fault and did not land. The three raiding parties
were reorganised and by 0100 hrs they had accurately established their position
on the coast. Y force, comprising 120 men from Nos 1 & 2 Troop, was under the command of
Captain J McNeil. Their objective was the hill feature. Progress was slow due to
the extra distance, irrigation ditches, mines and wire but they reached their
objective after 2 hours. They split into two troops, one to attack the top of the
hill and the other to clear the houses and to block the road to the north. The hill was defended mainly by mines and booby traps with the enemy
concentrated to the north. The troop searched the lower ground and blew up a PzKw Mk III Special tank found in a cave. In the action, they killed six enemy
and captured four at a cost of four casualties to themselves.
Their route back to the beach took them close to No 6 Troop's
'bridge' objective. As they approached they heard the unmistakable skirl of bag pipes
playing the 'Pwbrrachd of Donald Dubh'. McNeil then ordered his piper to
play his Troop's march 'Green Hills'. The two Troops
subsequently met up without firing
a single shot each other. No 9 and No 11 Commando were originally
formed as Scottish Commando Units and each
Troop had its own piper which proved
invaluable in this action for locating and rallying the men.
Captain Cameron, who led Z Force comprising Nos 4 and 6 Troops, also found progress very
slow, arriving at the bridge at 0500 hrs. With the support of artillery,
they overran a pillbox and suffered no casualties. 201 Brigade
advised that the home bank near the bridge had
been cleared of the enemy but Cameron
had his doubts. They rigged up a toggle rope
to bridge the two 15 foot gaps in the road bridge and made there way across, where they
took a number of German prisoners.
X Force, meantime, had swept through the spit taking one prisoner
but suffering 5 casualties to a mine. They joined up with Y Force and returned to
their home bank at 07.30 hrs in American DUKW amphibious wheeled vehicles. 9
Commando lost 9 men and suffered 21 wounded in the operation but they killed 16
enemy and took 28 prisoners. As intended, Operation Partridge persuaded the
enemy to reinforce this part of the front line to the betterment of operations
in other areas.
Anzio
A plan to drop parachutists on high ground overlooking the
planned landing beaches at Anzio was set aside in favour of an overland assault.
The objective was to deny the elevated position to the enemy. On the morning of
January 20, 1944, No 9 Commando with 43 (RM)
Commando boarded HMS
Derbyshire. They sailed with the rest of the fleet,
arriving off the
beaches on the night of January 21/22. They made the shore without difficulty
but sustained a few casualties from an early morning aircraft attack.
[Map
courtesy of Google. 2019].
Each man carried 70 lb of equipment and supplies
with additional material carried in
a number
of heavily laden handcarts. They occasionally ran into enemy
patrols but their slow progress was mainly due to mud. Both Commandos were in position for the main
assault by 1330 hrs. They attacked from the NE and W and by 1430
hrs they were
securely on the high ground. Next morning the US Rangers took over their
positions and the Commandos were placed in reserve before returning to Naples on
an LST (Landing Ship Tank), arriving
there on the morning of the 25th January. It had been a relatively
easy operation but Anzio had not yet earned its dreadful reputation for fierce
fighting.
No 2 SS Brigade, of which No 9 Commando was part,
was placed on a state of readiness for further action
at short notice. Initially No 9 and No 43(RM) Commandos were to
join No 40 (RM) Commando to form part of a
counter-attack force. However, General McCreery, the Commander of X Force,
decided that Nos 9 and 43(RM)
Commando would extend his foothold in the hills west of Garigliano by taking control of the three peaks
of Monte Ornito -
Tugo (2000 ft), Ornito (2,400 ft) and Faito (3000 ft). The terrain was rocky,
uneven and in places very steep with scree slopes and there was virtually no
cover. Even without enemy action, supplying troops on these summits with food,
water and ammunition would involve a great deal of human effort.
Transport problems and lack of sleep
caused the attack to be delayed by 24
hours but the opportunity this presented to undertake
further reconnaissance was not used due to thick
mist and enemy shelling, which caused 16 casualties including 5 killed.
No 9 Commando passed Monte Tugo and proceeded NW,
where they came under heavy fire from a feature in front of Monte Faito. Three Troops
overran the stronghold against heavy mortar and shell fire, causing some casualties
and firing
continued while the Commando consolidated and reorganised. Their advance
continued still under fire, during which Tod suffered a bad injury to an arm. Major
E W Clark, the 2nd in command, was killed and six other officers wounded.
Against the withering fire they withdraw to Monte Ornito.
Interrogation of prisoners indicated that the enemy had withdrawn to Monte Faito
and a counter attack was likely. Tod was ordered to hand over command to his 2nd in command.
Against such determined opposition, reinforcements were needed to
continue the attack but meantime the increasing intensity of the enemy artillery
indicated that a counter attack was imminent. At 1600 hours it started with No
43 (RM) Commando taking the brunt, but they succeeded in beating it off. Such was the German determination to hold on to their defensive position, it
changed hands 6 times in the ensuing months before finally falling to French Goums.
Anzio was not yet finished with No 9 Commando. The Allied presence in the Anzio
area threatened the German lines of communication running north of Rome and
Kesselring had strongly counter-attacked from the end of January. No
9 Commando was ordered back to the area with Tod once more in command. They
arrived on March 2, 1944, under 167 Brigade of the 56th,
where they
undertook offensive patrolling.
 On March 10 they
were advised of an imminent operation
for which they had one week to prepare. It was known
that the Germans used three wadis, located about 11 miles N of Anzio
and 2 miles west of the main road north, as a forming
up point for counter attacks. On March 10 they
were advised of an imminent operation
for which they had one week to prepare. It was known
that the Germans used three wadis, located about 11 miles N of Anzio
and 2 miles west of the main road north, as a forming
up point for counter attacks.
The wadis formed
a U shape and each arm was given a code name (see opposite). Tod's plan
envisaged a night attack on Haydon
followed by Charles, which would open access to Laycock.
On clearing Laycock, a defensive position would be established. Tod split the Commando into 3 'two troop' squadrons
named A, B & C.
The
enemy were engaged at 0200 hrs on March 19 and Haydon was easily taken by B & C
Squadrons. Further machine gun fire was quickly silenced. A
Squadron and Tod's HQ came under artillery fire as they moved on the wadis but
they joined up with the B&C in Haydon and the
action to clear Charles commenced at 0530 hrs against heavy fire,
which materialised as a German counter-attack
with heavy sniper fire. Tod ordered his men back to Haydon.
The enemy concentrated heavy fire on their
positions preventing urgently needed supplies
from getting through. The evacuation of the wounded
was only possible under cover of a Red
Cross flag, which the Germans respected.
By the time darkness approached the Germans had mounted
several counter-attacks, which were beaten off, but
the enemy's determination and
ferocity would inflict such a high price on the Commandos,
that an earlier order from
15 Brigade to withdraw, was put in train. Improvised stretchers were used
to remove the wounded and Allied machine gun fire and
artillery discouraged the enemy
from pursuing the
withdrawal too closely.
No 9 Commando had lost 19 killed, 50 wounded and 4 missing in the action. The
Commando was withdrawn to Anzio and, with No 40 and the rest of the Brigade,
returned to Molfetta on the Adriatic for rest,
recuperation and reorganisation.
By May 1944, No 9
Commando was once again approaching full operational status. On the
night of May 25/26, under the Command of Major M R H Allen MC, 75 men were
involved in an operation to rescue Allied prisoners of war. They sailed from Termoli in an LCI to a point 30 miles south of Ancona,
70 miles behind
enemy held lines. They met up with A Force, who were responsible for handling
escaped prisoners of war. After an initial navigating error, a US Navy 'Beach Jumper Party'
guided them to the lading beach, where 120 POWs
(prisoners of war) were evacuated.
Albania
On Jul 28, 1944, a small party of 40 porters drawn from No 9 Commando, No 2 Commando, a company from the HLI
and others
were engaged in a raid on Albania,
codename 'Healing II.' It was designed to open up the coastline south of the Linguetta Peninsula
to supply the partisans, who desperately needed supplies.
The opposing force was a 150 strong German garrison at Spilje. However, a combination of events
conspired against the raiding party. Albanian Quislings had alerted the Germans,
so the element of surprise was lost, radio
communications were adversely affected by surrounding trees
and well placed machine gun nests took an increasingly heavy toll.
With time
running out, the Commanding Officer, Colonel Fynn, withdrew
his exhausted men, including the 60 wounded. 20 men
were killed in this action.
However, the result was better than had first appeared. Many of the German
defenders had been killed and wounded, together with a number of Quislings. The
garrison strength had been weakened to such an extent that local partisans had
rounded up the remaining Germans taking control over the coastal strip in
the area. Brigadier Davey, in a note to Colonel Fynn, considered the mission a
'complete success' notwithstanding the casualties.
Yugoslavia
In August
1944, Operation 'Gradient I' was designed to disrupt
enemy shipping in the northern Adriatic by destroying a swing bridge
between the islands of Lussino Piccolo and Lussino Grande.
This would cause enemy
vessels, plying their trade between Istria (Rumania?) and Yugoslavia, to take a longer
route and, in the case of ships travelling south, would put them within the
range of Allied naval forces at Ancona on the Italian
mainland.
109 men from No 9 Commando left Ancona in 3 MTBs and 1 MGB. One party was to
seize and destroy the bridge, while a second, using bicycles for transport, was
to destroy a local garrison. The operation took place on the night of
August 9/10, 1944. There was no opposition at the bridge, which was destroyed and
two Italian guards were taken prisoner. When the Commandos
failed to locate the local garrison, they
destroyed the local telephone exchange and returned with documents and some civilians for questioning. On the way
back to Ancona, a grateful American pilot was picked up after spending a week
adrift in the Adriatic.
Another account, which may relate to the same operation, states...
A raid by 109 Commandos on the bridge joining Cherso and Lussino Island and the
Fascist HQ at Nezerine (40 miles NE of Zadar) was successful against no real
opposition.
Greece
 No 9
Commando were tasked
to destroy a German radar station at Kythira on the
southern tip of Greece. A reconnaissance party parachuted in on the night of
10/11 September, 1944, to
discover the Germans had pulled out the day before. The
decision was taken to establish a naval base at Kapsali and No 9 Commando were
landed on the island on the 17th September and stayed in Greece for nearly
6 months, making up the bulk of Foxforce. Foxforce also included elements of the SBS
(Special Boat Section), LRDG (Long Range Desert Group), the Raiding Support
Regiment and later some Sappers and 350 men of the
Greek Sacred Squadron. No 9
Commando were tasked
to destroy a German radar station at Kythira on the
southern tip of Greece. A reconnaissance party parachuted in on the night of
10/11 September, 1944, to
discover the Germans had pulled out the day before. The
decision was taken to establish a naval base at Kapsali and No 9 Commando were
landed on the island on the 17th September and stayed in Greece for nearly
6 months, making up the bulk of Foxforce. Foxforce also included elements of the SBS
(Special Boat Section), LRDG (Long Range Desert Group), the Raiding Support
Regiment and later some Sappers and 350 men of the
Greek Sacred Squadron.
Tod was in overall command. His orders were to guard the naval base at Avlemonas
on the eastern end of the island and later Kapsali on the SW corner, where
weather and infrastructure were more favourable. However, as the Germans
retreated, division amongst the various resistance groups began to surface in
the political and security vacuum the German's left behind. ELAS
and EAM were controlled by the Greek Communist party, while EDES were
non-communist. All were against the Greek monarchy.
Foxforce HQ in Kythira was increasingly the focus for the reporting of malicious
stories about the three factions... by the three factions! Although diplomacy
was not part of his training, Tod thought he could
help prevent a civil war breaking out between the communist and
non-communist forces. On the mainland, ELAS
attempted to take control of towns as the
Germans retreated. This was the duty of the Greek Security Battalions left behind to
enforce law and order. The Allied Military Mission asked Foxforce to help and
together with 70 of Tod's men, and assisted by the Swedish Red Cross, the Security Battalions
were imprisoned on the Island of Spetsai for their own safety.
 As the German retreat continued, Tod found himself in a fast moving and changing
situation. When the Peloponnese (large peninsula in southern Greece) and the
island of Poros were evacuated by the Germans, the naval base at Kythira was
moved to Poros for operational reasons. Before leaving Kythira, Tod secured the
agreement of the Partisan leaders to uphold the Greek Government, keep the peace
and not to deport any individuals or factions. As the German retreat continued, Tod found himself in a fast moving and changing
situation. When the Peloponnese (large peninsula in southern Greece) and the
island of Poros were evacuated by the Germans, the naval base at Kythira was
moved to Poros for operational reasons. Before leaving Kythira, Tod secured the
agreement of the Partisan leaders to uphold the Greek Government, keep the peace
and not to deport any individuals or factions.
[Photo courtesy of David Cramer shows the ceremonial entry
into Athens on the 14th October 1944. The flag bearer was his father, L/C John
Cramer MM, who was the first to land in Greece on Kithera Island].
The move to Poros caught the Germans by surprise and hastened their withdrawal
from Piraeus and Athens. On October 14, Foxforce landed at Piraeus after
negotiating enemy minefields. They received a tumultuous welcome from the locals,
who had seen the last of the Germans leave the day before. One troop provided
guard duty at Kalamaki airfield, while the remainder of No 9 Commando took part
in a liberation parade in Athens and Tod was made a freeman of the city.
There then followed some rapid changes to Foxforce. The SBS and LRDG left Tod's
command and he returned to Italy to take over 2 SS Brigade. Major M R H Allen, MC,
assumed command and, at the end of October, No 9 Commando moved to Salonika, where
it undertook normal garrison duties. In early December Lt Col J M Dunning-White,
newly arrived from the UK, took over command. December proved to be a tense
month, as civil war broke out in Athens. Fortunately, it did not spill over into Salonika and 9 Commando returned to Italy in February, 1945, when the political
situation had settled down.
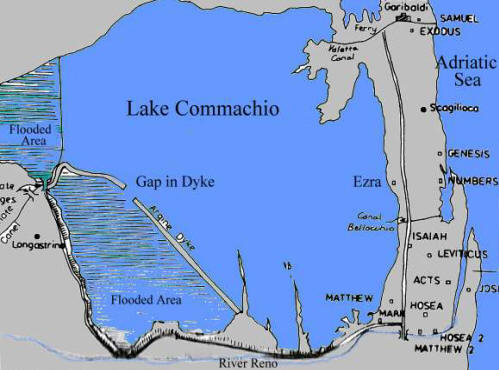 Italy Italy
On March 14,
1945, No 9 Commando rejoined the brigade, which by then had the Partisan 28
Garibaldi Brigade under command. For what turned out to be their last mission,
the Commando was to seize a spit of land running between Lake Commachio and the
sea and to tie down enemy forces in the area, while the main force tackled the Argenta Gap. They were to approach the south western half of the spit by
crossing the lake. When this had been cleared, and subject to other units
clearing areas to the north, No 9 would pass though and capture Porto Garibaldi.
As darkness fell, the LVTs formed up on the lake but became bogged down in mud.
With the hot weather, the water level had fallen well below
normal levels. Navigation on the lake was difficult,
since there were no features or landmarks against the flatness of the land.
Navigational lights were set up across the lake to assist and artillery support was
available if needed.
The Commandos transferred from their LVTs to storm-boats and Goatleys amid
considerable chaos. Dunning-White wanted to postpone the operation but Tod, in
overall charge, decided to push on, since the same problems would present
themselves again. The storm boats towed strings of Goatleys and, just before first
light, No 9 Commando reported that they were coming under fire and requested
that the supporting
artillery lay down covering fire.
By 0630 hrs, the Commando had landed. The enemy
positions were well dug in with
excellent camouflage. However, all but one
position, codenamed
Leviticus, succumbed to the attack. Leviticus resisted artillery, mortars and fighter bombers. In the
afternoon, a second attack was mounted under cover of a smokescreen and with a
piper playing 'The Road to the Isles.' As No 1 and 2 Troops approached at a
distance of 150 yards, the smokescreen lifted and they
immediately came under heavy Spandau
machine gun and mortar fire. The position
finally fell with the capture of
almost 100 prisoners. As the exhausting day was drawing to an end, Tod decided to
postpone the advance to the following day. No 9 was placed in reserve.
No 9 were then tasked to seize a bridge over the canal Fossa Marina, which ran
from Lake Comacchio to Reno at Argenta. They landed on April 13, 1945, a little
forward of 169 Brigade's position. The Buffs and Scots Guards advanced towards Fossa Marina but were held
short by the enemy. No 9 Commando were ordered
to pass through and seize the original objective and a hydro-electric plant.
However, very heavy fire prevented them from taking the two crossing places. A
second attempt the following night also failed when they found a 30 foot gap in
a bridge and the canal had been drained, leaving impassable mud several feet
deep. Despite these set-backs, No 9 closely observed the enemy positions and drew
up an accurate plan of their disposition. This information was of great value to
the 24 Guards Brigade when the enemy defences were finally overrun the following
night.
This was the last action by No 9 Commando and by mid November 1945, disbandment began when personnel, who had not already been demobilised,
were sent back to their regiments.
The following year, the Commando was disbanded.
Further Reading
Ex L/Cpl X, QGM
The
SAS & LRDG A seminal project
comprising moving stories of every Special Air Service and Long Range Desert
Group casualty in WW2. All proceeds go to charities.
There are around 300 books listed on our 'Combined Operations Books' page which can be
purchased on-line from the Advanced Book Exchange (ABE) whose search banner
checks the shelves of thousands of book shops world-wide. Type in or copy and
paste the title of your choice or use the 'keyword' box for book suggestions.
There's no obligation to buy, no registration and no passwords. Click
'Books' for more information.
|