|
Operation Infatuate, Walcheren - 1 to 8 November 1944.
The landing that gave Allied shipping
access to Antwerp docks

Background
Operation Infatuate, the codename for the
invasion of the Dutch Island of Walcheren, was a major Combined Operation's amphibious landing against
entrenched German defensive positions. The fortified island stood at the mouth of the
River Scheldt blocking Allied access to the captured port of Antwerp some 60 kilometres inland.
It was urgently needed to supply the advancing Allied armies as they moved
towards Berlin.
[Map courtesy of Google Map Data 2017].
The city of
Antwerp and its port had fallen to Dempsey's 2nd British Army in early September
1944. Montgomery's attention at the time was on securing several bridge crossings,
including the Rhine at Arnhem, in an operation code-named Market Garden. It held
the prospect of shortening the war by opening a clear route to
Germany and Berlin. There was, consequently, no priority given to securing the
approaches to Antwerp, which would require the island fortress of Walcheren to
be neutralised. Its formidable array of weaponry was garrisoned by the Fifteenth German Army.
 The First Canadian Army, under Crerar, was ordered by Montgomery to open
up the Antwerp area but Crerer also had orders to capture Boulogne and Calais. His forces
did advance north-westwards from Antwerp and approached Walcheren but were held up at the entrance of the narrow isthmus, which connected south Beveland to the mainland.
[See 'The Calagary Highlanders' below for more information on this
action]. The First Canadian Army, under Crerar, was ordered by Montgomery to open
up the Antwerp area but Crerer also had orders to capture Boulogne and Calais. His forces
did advance north-westwards from Antwerp and approached Walcheren but were held up at the entrance of the narrow isthmus, which connected south Beveland to the mainland.
[See 'The Calagary Highlanders' below for more information on this
action].
Plans and Preparations
With the failure of Market Garden, Montgomery issued a directive on
the 9/10/1944 giving priority to opening the River Scheldt to Allied
shipping. Some 10 days later the Canadians began attacking along the isthmus breaking into the Breskens
pocket. By the end of the month the Germans had been cornered in Zeebrugge, surrendering on November
2. Both south and north Beveland had been
virtually cleared and the time was right for the assault of Walcheren itself. Operation Infatuate was activated.
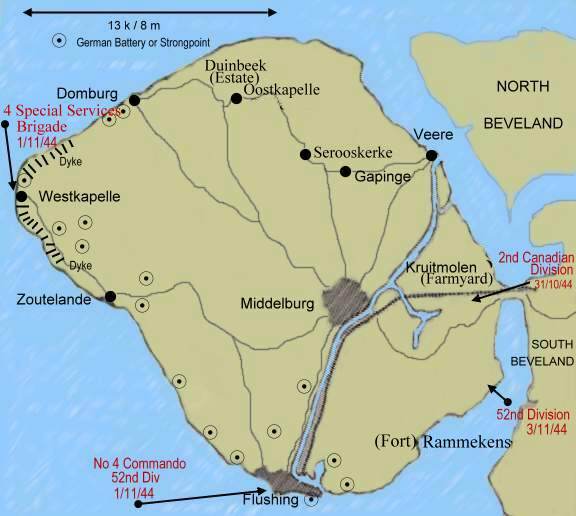
A three pronged assault
was planned with Commandos landing at Westkapelle in the west of the island and
at Flushing in the south. The Canadians were to cross by a water channel close to the causeway in the east.
However, it soon became clear that the
tidal flats around the water channel were virtually impassable, leaving the Canadians with the exceedingly hazardous option of a direct
assault along the well defended causeway - an exposed stretch about 30/40 yards wide and
 1200/1500 yards long. The Canadians were to
establish a bridgehead on the island through which the British 52nd Lowland
Division would pass to continue the assault. Against much scepticism and opposition, General Simonds'
plan to breach the island's dykes and flood the interior was adopted. 1200/1500 yards long. The Canadians were to
establish a bridgehead on the island through which the British 52nd Lowland
Division would pass to continue the assault. Against much scepticism and opposition, General Simonds'
plan to breach the island's dykes and flood the interior was adopted.
[Photo;
Landing craft tanks (LCTs) carrying Royal Marine Commandos to their
landing beach on the island of Walcheren at Westkapelle, the most
western point of the island. This was during the final phase of the
battle to free the River Scheldt to allow Allied ships to use the
Belgian port of Antwerp, already in Allied hands. In the foreground is
LCT 979 followed by LCT 980; further LCTs are behind whilst another
long line of LSTs can be seen in the background. © IWM A 26274].
After the ill fated 'Market Garden' operation on October 20, No. 2 Dutch Troop of 10 IA
(Inter-Allied) Commando moved to Brugge in Belgium and
were incorporated under the command of No. 4 Brigade. They split up
and were attached to other fighting units where, in the case of some
officers and men, their native language skills helped Allied liaison
with the local population, while others fought
alongside their comrades in arms.
Operation Infatuate gets Underway
The force sailed from Ostend at 0315 hours and by 0930 hours they
reached Walcheren. The heavy ships bombarded the German defences
with the 15inch guns of HMS Warspite, the guns of
LCGs, the rockets of LCT(R)s and a squadron of rocket-firing
Typhoons. However, the German defences held fire until the assault
landing craft and support craft made for the shore. Several were hit, including a LCT(R),
which received a direct hit. Thirty landing craft from the Close Support Squadron
were lost and over 300 men were killed in the action.

    
 [Photos
l-r; 1)Taken from LCT 532. LCIs ahead of the main armour with
Walcheren just visible in the distance. 2) A direct hit on a pillbox
by a salvo of rockets from an RAF Typhoon. 3) The major forces of
armour going in. 4) An LCS is ablaze after being hit by accurate shell
fire. 5) Royal Marine Commandos aboard LCT 980 about 20 minutes before
beaching. 6) LCT 532 unloading amphibious tanks. 7) LCT 980 preparing
to discharge her amphibians. [Photos
l-r; 1)Taken from LCT 532. LCIs ahead of the main armour with
Walcheren just visible in the distance. 2) A direct hit on a pillbox
by a salvo of rockets from an RAF Typhoon. 3) The major forces of
armour going in. 4) An LCS is ablaze after being hit by accurate shell
fire. 5) Royal Marine Commandos aboard LCT 980 about 20 minutes before
beaching. 6) LCT 532 unloading amphibious tanks. 7) LCT 980 preparing
to discharge her amphibians.
 The Assault The Assault
The three RM Commandos of No 4 SS Brigade,
together with No 4 (Belgian) and No 5 (Norwegian)
troops of No 10 (IA) Commando, commanded by Peter Laycock, landed at Westkapelle on the western side of the island.
No 4 Commando, with
Nos 1 and 8 (French) troops of No 10 Inter Allied Commando, crossed from Breskens and attacked Flushing
with support from the 155th Infantry brigade. The
brigade had trained for this assault in the Ostend area during October.
The bombing of Walcheren
in October, by RAF Bomber Command, had breached the dykes around the
island turning it into a massive lagoon, rimmed by long stretches of
intact dykes. German gun emplacements on the unaffected areas, virtually
provided a continuous
fortification bristling with guns of every calibre.
The Marines placed great reliance on Weasel and Buffalo LTs
for transport to the landing areas. The RM Commandos
were to seize the shoulders of the gap in the dyke and then to fan out north and south to roll up the remainder of the
German defences
by linking up with the southern thrust. The RAF provided air support and the 79th Armoured Division provided naval gunfire
support, including Landing Craft Gun (Medium) and multiple-rocket launch systems. After some debate over the sea conditions, the
operation was planned for November 1. No 4 Commando landed at 0545 hours and the remainder at 1000 hours.
 On the day of the assault, a heavy mist over the Dutch and Belgian airfields limited RAF
support for the actual landings, although the skies over Walcheren itself were clear. No 4 Commando, under Lt-Colonel Dawson DSO, had a
problem in finding a suitable place to disembark. Dawson sent a small reconnaissance party (known as Keepforce) ashore in two LCPs.
They were followed by Nos 1 and 2 troops, who secured the beachhead with minimal casualties and soon began to take prisoners. The
main body came in at 0630 hours but, by this time, the Germans were totally alert and opened heavy fire with machine guns and 20mm
cannon. Despite this, the Marines landed with only two or three casualties, although the LCA
containing the heavier equipment, including 3 inch mortars, hit a
stake and sank 20 yards off shore but the mortars were successfully salvaged. On the day of the assault, a heavy mist over the Dutch and Belgian airfields limited RAF
support for the actual landings, although the skies over Walcheren itself were clear. No 4 Commando, under Lt-Colonel Dawson DSO, had a
problem in finding a suitable place to disembark. Dawson sent a small reconnaissance party (known as Keepforce) ashore in two LCPs.
They were followed by Nos 1 and 2 troops, who secured the beachhead with minimal casualties and soon began to take prisoners. The
main body came in at 0630 hours but, by this time, the Germans were totally alert and opened heavy fire with machine guns and 20mm
cannon. Despite this, the Marines landed with only two or three casualties, although the LCA
containing the heavier equipment, including 3 inch mortars, hit a
stake and sank 20 yards off shore but the mortars were successfully salvaged.
The marines now fought their way through the German strong-points.
Unfortunately, the need to
leave rearguards against infiltration, hindered progress. However,
despite losing two LCAs to heavy enemy gun fire, the leading battalion of 155
Brigade began to land at 0830 hours which immediately improved the
situation.
German
prisoners were pressed into service, unloading stores and supplies. A
good proportion of them were poor quality troops, many of whom suffered from stomach complaints. Curiously,
however, their defence
positions were well stocked with food and ammunition. By 1600 hours,
the Commandos had reached most of their objectives and decided to
consolidate, as the day drew to a close.
Brigadier Leicester's plan, for the attack on Westkapelle, called for three troops of No 41 (RM)
Commando, under Lt-Colonel E C E Palmer RM, to land on the north
shoulder of the gap blown in the dyke. The objective was to clear the area
between there and the village of Westkapelle. The remainder of the Commando, along with the two No 10 (IA) Commando troops, would then
come ashore in Weasels and Buffalos launched from LCTs. Their mission would be to
 clear Westkapelle and then move north. No 48 (RM)
Commando, under Lt-Colonel J L Moulton DSO, would use the same methods but come ashore south of the gap. From there, they would
advance on Zoutelande, two miles to the south. Finally, No 47 (RM) Commando, under Lt-Colonel CF Phillips DSO, would land behind
No 48 and to meet up with No 4 Commando near Flushing. clear Westkapelle and then move north. No 48 (RM)
Commando, under Lt-Colonel J L Moulton DSO, would use the same methods but come ashore south of the gap. From there, they would
advance on Zoutelande, two miles to the south. Finally, No 47 (RM) Commando, under Lt-Colonel CF Phillips DSO, would land behind
No 48 and to meet up with No 4 Commando near Flushing.
[Photo; The occupation of Walcheren
Island is going fast. Flushing is in the hands of the British and
troops, fanning out to the west, are close to the Marine Commandos
coming down from the Westkapelle beachhead (where this picture was
taken). This image shows German coastal guns and blockhouses which
the British forces quickly put out of action. © IWM (BU 1273)].
No 41 overran a pillbox in their path and pushed onto Westkapelle,
where they were confronted by a battery of four 150mm guns which were
reduced with supporting fire from tanks. The Commandos then moved north along the dyke.
No 48 also
encountered a battery of 150mm guns. The leading troop commander was killed and
several men wounded in an attack on the position. In response to
another assault on the gun emplacements, the enemy released an
enfilade of intense mortar fire. Supporting fire from
field batteries in the Breskens area, together with Typhoon attacks,
considerably softened up the battery allowing another troop, under
cover of smoke, to reach the centre of the battery, putting it out of
action.
The next day, No 4 Commando, together with 5 King's Own Scottish
Borderers, continued with the battle for Flushing. No.5 (French) Troop
were involved in an action against a strongpoint nicknamed Dover. One
section of the troop gained the roof of a cinema and opened fire on
the strongpoint with their PIAT. The other sections moved along the
street and through back gardens. As the troop was preparing for
the final assault, Typhoons attacked the enemy position. That
afternoon, the Troop resumed their advance and reached the corner
overlooking their objective. One house remained occupied by the
Germans and, as they made for the strongpoint, they suffered several
casualties from the fire of No 5 Troop. No 1 Section was now by the
Anti-Tank wall and firing PIAT bombs into the embrasures of the
strongpoint at very short range. Corporal Lafont was on the point of
breaching the strongpoint with a made-up charge at the ready, when the
German defenders surrendered.
 No 48 (RM) Commando pushed on at first light and took Zouteland,
meeting only light opposition. No 47 took over the advance but soon
came up against a strong fortified position with an anti-tank ditch
and huge 'Dragon's Teeth'. The weather had closed in and no air support
was available, so they attacked supported only by artillery fire. They
also came
under heavy mortar fire and suffered several casualties. No 48 (RM) Commando pushed on at first light and took Zouteland,
meeting only light opposition. No 47 took over the advance but soon
came up against a strong fortified position with an anti-tank ditch
and huge 'Dragon's Teeth'. The weather had closed in and no air support
was available, so they attacked supported only by artillery fire. They
also came
under heavy mortar fire and suffered several casualties.
[Photo; Royal Marine Commandos going down the ramp
of a landing craft tank in an Alligator amphibious personnel carrier,
whilst some more men in a Weasel amphibious carrier are about to
follow. LCT 532 has just beached on the island of Walcheren at
Westkapelle, the most western point of the island. Note the badly
damaged buildings and sea defences in the background. © IWM (A
26268)].
The other
half of the Commando, having moved along the dyke, were confronted by
another 150mm battery. Their approach was obstructed by pockets of
resistance, which were not cleared until nightfall. The three Troops
halted in front of the battery and received much-needed food and
ammunition before they repulsed a German counter-attack.
Defensive stakes
and mines, embedded in the base of the dyke, made it difficult for
supply craft to land stores. By the third and fourth days, the Commando
were forced to 'endure' captured German rations. To the relief of all
concerned, supplies were parachuted in on the fifth day near Zouteland.
No 41 and
No 10 Commandos reached Domburg on the morning of D+1, where they
encountered strong resistance. That evening, Brigadier Leicester
ordered No 41, less one Troop, to assist No 47 in the south, leaving
the Troops of No 10 and one of No 41 to finish mopping up Domburg.
No 4 Commando was relieved by 155 Brigade and embarked on LVTs to
assault two batteries, W3 and W4, situated north-west of Flushing. They
had been fighting for 40 hours and needed a short break for rest and
recuperation. After
landing in a little known gap in the dyke, Lt-Colonel
Dawson secured relief of 24 hours for his men from Brigadier
Leicester, however, it was well after dark before the
Commando was relieved by 155 brigade. In the event, No 47 (RM) Commando
overcame the opposition south of Zouteland later that day and linked up
with No 4 Commando. Meanwhile, No 10 and the Norwegians cleared Domburg, showing particular courage in the face of heavy opposition,
which cost them a number of casualties.
[Photos l -r: (1) Amphibians (Buffalos) coming ashore at
Westkapelle; (2) Oranjemolen (Orange Mill) at Flushing (Vlissingen)
where No. 4 Commando landed early on 1/11/44; (3) French
Commando Officers in Flushing - Lt. Guy de Montlaur, Lt. Guy Hattu,
Commandant Phillippe Kieffer & Lt Jacques Senée; (4) Bunkers of
the German coastal battery at Westkapelle. The first two are for 9.4
cm artillery and the third for fire direction].
See also an account of a RNVR Lieutenant who was
in charge of a Landing Craft Tank carrying Buffalos and Royal Marines. They
landed in a gap left in the dyke by RAF Bombers a few months earlier.
Click here.
The Outcome
 Nos 4, 47
and 48 Commandos then regrouped at Zouteland and a two-day pause ensued
while they re-supplied. The remaining enemy resistance was
concentrated in the area north-west of Dombug. Nos 4 and 48 Commando
set off on foot, although they used LVs to cross the gap at
Westkapelle, in order to reinforce No 10 and No 41. While No 41
assaulted the last remaining battery, W19, No 4 cleared the Overduin Woods and pushed on to Vrouwenpolder opposite North Beveland. No.48
remained in reserve. This phase of the operation began on November 8. Nos 4, 47
and 48 Commandos then regrouped at Zouteland and a two-day pause ensued
while they re-supplied. The remaining enemy resistance was
concentrated in the area north-west of Dombug. Nos 4 and 48 Commando
set off on foot, although they used LVs to cross the gap at
Westkapelle, in order to reinforce No 10 and No 41. While No 41
assaulted the last remaining battery, W19, No 4 cleared the Overduin Woods and pushed on to Vrouwenpolder opposite North Beveland. No.48
remained in reserve. This phase of the operation began on November 8.
[Photo;
Lt./General
Wilhelm Daser, Commander of the 70th Infantry Division & Fortress
Commander of Walcheren, led into captivity accompanied by Major John
Knox, Brigade Major Royal Artillery of the 52nd Lowland Division].
At 0815, four Germans approached the Allied troops to ask for a
surrender of all remaining German troops in the area. After some
negotiation, 40,000 Germans surrendered.
No 4 SS Brigade had lost 103 killed, 325 wounded and 68 missing during
eight days of fighting. By the end of November, after a massive
minesweeping operation of the Scheldt, the first cargoes were being
unloaded at Antwerp.
Organisation
of Forces
Full
details of the opposing forces are provided below courtesy of Mr J N
Houterman, Middelburg, Walcheren. Source is the Dutch language book on
the liberation of Walcheren.
ALLIED FORCES
52nd (Lowland) Infantry
Division
Major-General Edmund
Hakewill Smith
General Staff Officer 1 (GSO1): Lieutenant-Colonel
F. Gordon Maxwell
Commander Royal Artillery (CRA): Brigadier Lionel
B.D. Burns (also Commander Burnsforce)
Infatuate I (Flushing)
155th Infantry Brigade
Brigadier James F.S. McLaren
Brigade-Major: Major A.L. Holmes
4th Battalion The King’s Own Scottish
Borderers
Lieutenant-Colonel Christian L. Melville
5th Battalion The King’s Own Scottish
Borderers
Lieutenant-Colonel William F.R. Turner
7th/9th Battalion The Royal
Scots
Lieutenant-Colonel Michael E. Melvill
Attached
No 4 Commando
Lieutenant-Colonel Robert W.P. Dawson
Second-in-Command (2 i/c): Major B. William S. Boucher-Myers
- No. 5 & 6 (French) Troops
Commandant Philippe Kieffer
Causeway Sloedam
5th Canadian Infantry Brigade
Brigadier William J. Megill
Brigade-Major: Major George H. Hees
The Black Watch (RHR) of Canada
Lieutenant-Colonel Bruce R. Ritchie
The Calgary Highlanders
Major Ross L. Ellis
Le Régiment de Maisonneuve
Lieutenant-Colonel Julien Bibeau
157th Infantry Brigade
Brigadier James D. Russell
Brigade-Major: Major M. Russell White
5th Battalion The Highland Light
Infantry Regiment
Lieutenant-Colonel Rhoddy L.C. Rose
6th Battalion The Highland Light
Infantry Regiment
Lieutenant-Colonel Edward L. Percival
1st Battalion The Glasgow Highlanders (HLI)
Lieutenant-Colonel William I. French
156th Infantry Brigade
Brigadier Cyril N. Barclay
Brigade-Major: Major Alistair C.S. Troup
4th/5th Battalion The Royal
Scots Fusiliers
Lieutenant-Colonel Arthur N. Gosselin
6th Battalion The Cameronians (SR)
Lieutenant-Colonel A. Ian Buchanan-Dunlop
7th Battalion The Cameronians (SR)
Lieutenant-Colonel Claude F. Nason
Infatuate II (Westkapelle)
4th Special Service Brigade
Brigadier Bernard W. Leicester
General Staff Officer 1 (GSO1): Lieutenant-Colonel Maurice W. Hope
Brigade-Major: Major Benjamin G. Pugh
41 (Royal Marine) Commando
Lieutenant-Colonel Eric C.E. Palmer
Second-in-Command (2 i/c): Major N. Peter Wood
47 (Royal Marine) Commando
Lieutenant-Colonel C. Farndale Phillips
Second-in-command (2 i/c): Major Patrick M. Donnell
48 (Royal Marine) Commando
Lieutenant-Colonel James L. Moulton
Second-in-command (2 i/c): Major Donald H.W. Sanders
Attached
No 10 (Inter Allied) Commando
Lieutenant-Colonel Peter Laycock
Second-in-command (2 i/c): Major Godfrey R. Franks.
- No. 4 (Belgian) Troop
Captain Georges M.G.U.J. Danloy
- No. 5 (Norwegian) Troop
Captain Rolv Hauge
X Troop (Czechs) (Walcheren is about half way down the web page but the
whole article is worth reading.)
Royal Navy Support
Naval Force "T"
Captain Anthony F. Pugsley, RN
Deputy Senior Officer Assault Group (DSOAG): Lieutenant-Commander Ronald
McC. P. Jonas, RN
Deputy Commander (Flushing assault): Captain Colin D. Maud, RN
Training Commander & Beachmaster: Commander Redvers M. Prior, RN
Support Squadron Eastern Flank
Commander Kenneth A. Sellar, RN
Bombardment Squadron
Captain Marcel H.A. Kelsey, RN (HMS Warspite)
"H" LCA Squadron
Lt.Commander Stuart J. Vernon, RNVR
"N" LCT Squadron
Lieutenant-Commander Bernard K.C. Arbuthnot, RN
79th Armoured Division Support
30th Armoured Brigade
Brigadier Nigel W. Duncan
Brigade-Major: Major Michael Morris, Lord Killanin
11th Battalion The Royal Tank Regiment
Lieutenant-Colonel Raylton Dixon
1st Lothian & Border Yeomanry
Lieutenant-Colonel Christopher J.Y. Dallmeyer
1st Assault Brigade Royal Engineers
Brigadier Geoffrey L. Watkinson
Brigade-Major: Major McAlister P. Lonnon
5th Assault Regiment Royal Engineers
Lieutenant-Colonel Richard H. Walker
6th Assault Regiment Royal Engineers
Lieutenant-Colonel Joseph K. Shepheard
GERMAN FORCES
70. Infanterie-Division
[Middelburg]
Gen. Lt. Wilhelm J.
Daser [also Festungskommandant (Fortress Commander)]
[6.11.1944]
1. Generalstabsoffizier (la): Major im
Generalstab KarI-Wilhelm L.O.W. von KIeist [6.11.1944]
1.
Ordonnanzoffizier (Ol): Oberleutnant AIfred Bauer [6.11.44]
{Dates of capture in brackets, where known]
GRENADIER-REGIMENT 1019
[Vlissingen; SW Walcberen]
Oberst Eugen J. Reinhardt
(also Kommandant
Verteidigungsbereich
Vlissingen) [3.11.1944]
Adjutant: Oberleutnant Ruh
[3.11.1944]
I. Bataillon
[Vlissingen]
Hauptmann Rode
ll. Bataillon [SE
Walcberen, Fort Rammekens t/m
Sloedam]
Hauptmann Wilhelm
Heine
GRENADIER-REGIMENT 1020
[Oostkapelle; NW Walcheren]
Oberstleutnant Wilhelm E.R.E.
Veigele [8 11 1944]
Adjutant: Oberleutnant Otto
Radant [8.11.1944?]
I.
Bataillon
Major Müller
ll. Bataillon
Hauptmann
Schicke
ARTILLERIE-REGIMENT 170
[Middelburg; batteries at
Arnemuiden and Nieuwland]
Oberst Franz A.M. Lex
[7.11.1944]
Divisions-Füsilier-Bataillon
170
[NE Walcheren from
Sloedam to Veere]
Major
Gottlieb Maier
Pionier-BataiIlon 170 [Sloedam]
Hauptmann Kurt Winter
Attached
FESTUNG-STAMM-TRUPPEN LXXXIX
[Nieuwland; E Walcheren]
Oberst Otto K.A. Gajer
Independent
*RheinflottiIle
Fregattenkapitän Alexander
Stein [Evaded capture]
**SEEKOMMANDANT
SÜDHOLLAND
[Vlissingen]
Kapitän zur See Frank
Aschrnann [Evaded capture]
Stabsoffizier beim Stabe (Al):
Kapitänleutnant Hans-
Bodo
Tolkmitt [Evaded capture]
Adjutant: Oberleutnant Dr.phiI.
Hans-Christian
Wiester
[Evaded capture]
***Marine-Artillerie-Abteilung
202 [Domburg]
Korvettenkapitän Robert Opalka
[8.11.1944]
Gefechtsstand
(1./202)
Marineküstenbatterie
Ostkapelle (4./202) (W .19)
Marineküstenbatterie Domburg
(5./202) (W .17)
Marineküstenbatterie
Westkapelle (6./202) (W.15)
Marineküstenbatterie
Zoutelande (7./202) (W .13)
Marmeküstenbattene Dishoek
(8./202) (W.11)
Oberleutnant Helmut Lange (+
3.11.1944)
Marineküstenbatterie Kernwerk
(9./202) (W.6)
Oberleutnant Josef Rülle
[2.11.1944]
leichte bewegliche Flak-Batterie
Oberleutnant Bruno Jenner
[3.11.1944]
Marine-Flak-Abteilung
810 [Vlissingen/Zwanenburg]
Korvettenkapitän Hans Köll
[3.11.1944]
Gefechtsstand (1./810) (W
.4)
Oberleutnant Ernst
Kipper [3.11.1944]
Marineflakbatterie Nord
(2./810) (W.2)
Oberleutnant
Paul Kühnemann [7.11.1944]
Marineflakbatterie West
(3./810) (W.3)
Leutnant
Hans Krautmann [7.11.1944]
Marineflakbatterie Ost
(4./810) (W.I)
Oberleutnant
Leonhard Arenz [Evaded
capture]
leichte Flakbatterie Seedeich
(6./810)
Oberleutnant
Wilhelm Schüler (+ 1.11.1944)
? (? ./810)
Oberleutnant
Adolf Rapp (from 3.11.1944
acting batallion commander).
[Evaded capture] ? (1./810)
Oberleutnant Hans Plass (+
4.11.1944) 1 (1./810)
Oberleutnant Gottfried
Kuhlmann [7.11.1944]
Hafenkommandant Vlissingen
[Vlissingen]
Korvettenkapitän Otto
Würdemann [3.11.1944]
Adjutant: Kapitänleutnant Dr.
Hans-Günther Heinze (also
Ortskommandant Vlissingen)
Attached officer:
Kapitänleutnant Kurt
Blessinger [1.11.1944]
[Footnotes].
*The Rheinfottille (Rhine Flotilla) was completely independent and
was subordinate to the Admiral in the Netherlands.
* *The
Seekommandant Sudholland (Naval Commander Southern Holland), with
subordinate units, was independent; i.e. for deployment on land the
naval units came under the Festungskommandant (Fortress Commander).
***Marine-Artillerie-Abteilung 202. The battery
commanders of the Marine-Artillerie-Abteilung 202 (Naval Artillery
Battalion 202) are known by name and date of capture but they cannot
be pinpointed down to the exact battery. However the officers
involved were; Kapitanleutant Hermann Koster (1 11 44), Oberleutnant
Paul Litzba (1 11 44), Kapitanleutnant Anton-Joachim Lange
[(10/202?) (7 11 44)] and Oberleutnant Gerhard Leutritz
[(Stabsbatterie?) (7 11 44)].
 Memorials and Plaques Memorials and Plaques
  Subject -
the landing of the
52nd Lowland Division on 1st Nov '44
against entrenched German defensive positions. Location - 'Uncle
Beach' Vlissingen, Walcheren Island, Scheldt Estuary, Holland.
Other Info - the heavily fortified island blocked the River Scheldt
to Allied shipping and thereby to the newly captured Antwerp. The Division was under the commando
of Major-General Edmund
Hakewill Smith with General Staff Officer 1 (GSO1) Lieutenant-Colonel
F. Gordon Maxwell and Commander Royal Artillery (CRA): Brigadier Lionel
B.D. Burns (also Commander Burnsforce). Subject -
the landing of the
52nd Lowland Division on 1st Nov '44
against entrenched German defensive positions. Location - 'Uncle
Beach' Vlissingen, Walcheren Island, Scheldt Estuary, Holland.
Other Info - the heavily fortified island blocked the River Scheldt
to Allied shipping and thereby to the newly captured Antwerp. The Division was under the commando
of Major-General Edmund
Hakewill Smith with General Staff Officer 1 (GSO1) Lieutenant-Colonel
F. Gordon Maxwell and Commander Royal Artillery (CRA): Brigadier Lionel
B.D. Burns (also Commander Burnsforce).
  Subject - the landing of
No 4 Commando Brigade*
on 1st Nov '44 against entrenched German defensive positions. Location
- Westkapelle, Walcheren Island, Scheldt Estuary, Holland.
Other Info - the heavily fortified island blocked the River Scheldt
to Allied shipping and thereby to the newly captured Antwerp.
[*
At the time of the action they were called No 4 Special Services
Brigade being re-designated No 4 Commando a few weeks later]. Subject - the landing of
No 4 Commando Brigade*
on 1st Nov '44 against entrenched German defensive positions. Location
- Westkapelle, Walcheren Island, Scheldt Estuary, Holland.
Other Info - the heavily fortified island blocked the River Scheldt
to Allied shipping and thereby to the newly captured Antwerp.
[*
At the time of the action they were called No 4 Special Services
Brigade being re-designated No 4 Commando a few weeks later].
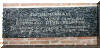
  Subject - a monument to
No 4 Commando near the Orange Mill
(where they landed). Location - Flushing, Walcheren Island, Scheldt
Estuary, Holland. Other Info - the original plaque attached to the
monument is not in place in this photo (left) but the text can be seen in
the photo (right). Subject - a monument to
No 4 Commando near the Orange Mill
(where they landed). Location - Flushing, Walcheren Island, Scheldt
Estuary, Holland. Other Info - the original plaque attached to the
monument is not in place in this photo (left) but the text can be seen in
the photo (right).
_small.jpg) _small.JPG) Subject -
41 Royal Marine Commando. Location - Domburg,
Zeeland, Walcheren.. Other Information - The wide angle view shows
the front of the memorial with the dedication in Dutch and English. The
close up lists the names of those who lost their lives. 41 RM Commando was
part of the
4th Special Service Brigade under
Brigadier Bernard W. Leicester. The
General Staff Officer 1 (GSO1) was Lieutenant-Colonel Maurice W. Hope and
Brigade-Major was Major Benjamin G. Pugh. 41 RM Commando was under the
command of Lieutenant-Colonel Eric C.E. Palmer with
Second-in-Command (2 i/c): Major N. Peter Wood. Subject -
41 Royal Marine Commando. Location - Domburg,
Zeeland, Walcheren.. Other Information - The wide angle view shows
the front of the memorial with the dedication in Dutch and English. The
close up lists the names of those who lost their lives. 41 RM Commando was
part of the
4th Special Service Brigade under
Brigadier Bernard W. Leicester. The
General Staff Officer 1 (GSO1) was Lieutenant-Colonel Maurice W. Hope and
Brigade-Major was Major Benjamin G. Pugh. 41 RM Commando was under the
command of Lieutenant-Colonel Eric C.E. Palmer with
Second-in-Command (2 i/c): Major N. Peter Wood.
 _small.jpg) Subject -
Belgian Commando. Location - Domberg, Zeeland,
Walcheren. Other Information - The wide angle view is of the front of
the memorial with the dedication. The close up lists the names of those who
lost their lives. No. 4 (Belgian) Troop, under Captain Georges M.G.U.J. Danloy,
was part of No 10 (Inter Allied) Commando under the overall command of
Lieutenant-Colonel Peter Laycock.
Second-in-command (2 i/c) was Major Godfrey R. Franks. Subject -
Belgian Commando. Location - Domberg, Zeeland,
Walcheren. Other Information - The wide angle view is of the front of
the memorial with the dedication. The close up lists the names of those who
lost their lives. No. 4 (Belgian) Troop, under Captain Georges M.G.U.J. Danloy,
was part of No 10 (Inter Allied) Commando under the overall command of
Lieutenant-Colonel Peter Laycock.
Second-in-command (2 i/c) was Major Godfrey R. Franks.
_small.JPG) _small.JPG) Subject -
Norwegian Commando. Location - Domberg, Zeeland,
Walcheren. Other Information - Wide angle is the view of the front of
the memorial with dedication in Dutch and Norwegian. Close up lists the
names of those who lost their lives. No. 5 (Norwegian) Troop, under ,Captain Rolv Hauge
was part of No 10 (Inter Allied) Commando under the overall command of
Lieutenant-Colonel Peter Laycock.
Second-in-command (2 i/c) was Major Godfrey R. Franks. Subject -
Norwegian Commando. Location - Domberg, Zeeland,
Walcheren. Other Information - Wide angle is the view of the front of
the memorial with dedication in Dutch and Norwegian. Close up lists the
names of those who lost their lives. No. 5 (Norwegian) Troop, under ,Captain Rolv Hauge
was part of No 10 (Inter Allied) Commando under the overall command of
Lieutenant-Colonel Peter Laycock.
Second-in-command (2 i/c) was Major Godfrey R. Franks.
The Calgary Highlanders (by Lt William J Smith) - personal recollections.
I
served as a Lieut. Rifle Platoon Leader, 9 Platoon, "D" Company of the
Calgary Highlanders - a replacement for my predecessor, Lt.
Stewart, who was killed on the Causeway right at its entrance on to the
Island.
It was a battered, depleted Platoon I took over. They had been in hard
fighting right from the time the push to clear the Scheldt estuary
first started. I was saddled with a legacy of nine "ghosts," - men who
should have been with me but were absent and unaccounted for. I was ordered
to find out from the survivors where and when these missing men had
last been seen, and in what circumstances. I was able to report very
few facts and those I could were painful. When I went up to join the
Highlanders I was accompanied by two other 'new' lieutenants, also
replacing casualties of the assault on Walcheren. Their names were
Brown, and Doakes, as I remember. We were along the southern edge of
what became known as The 'Nijmegen Salient' which the Allies
established as a fall-back from the Arnhem failure. There in early
December, outside Groesbeek, on the edge of the Reichswald Forest, I
was wounded on patrol. Brown was killed, shot in the kidneys by
a sniper, and Doakes died of Diphtheria in a hospital somewhere in
Holland.
Sojourning at Aldershot, awaiting orders to return to the Continent,
was a friend from the Highlanders who had been wounded on the Causeway
before I had caught up to him. He recounted to me that his Company
("A") had lost all their Officers. The causeway was 30 yards wide,
about 1 mile long, straight and barren. Facing the 5th Brigade were
dug-in fixed-fire machine guns and Oerlikon Rapid-firing 20mm Anti-
Aircraft Cannons, the belts of which carried cartridges in a fixed
order of 1 armour-piercing shell, 1 high explosive shell and 1 tracer.
The troops of the 5th Brigade had no advance knowledge of this lethal
mix but they soon knew what they were facing! It took a high calibre
of men to run the gauntlet of the withering fire in such an exposed
situation. It's not surprising that the
Infantryman's unofficial motto was 'It aint our business to die for
our country; our job is to make the other guy die for his country!'
He, with his men, had moved about six-hundred yards off the Causeway
onto the Island when they were pinned down. It had been decided that
the 5th Brigade was done for and would be replaced. Accordingly, at
dawn of the 1st (or 2nd?) November an artillery barrage was to be laid
on, behind which their exchange with the Maisonneuves would be carried
out. It is difficult for those who have not experienced the chaos and
confusion of war to appreciate that in a battle the situation changes
by the minute. They had no radio or telephonic communication and
runners often did not make it through. The big shots directing the
operation did not know how far forward the Highlanders had fought
their way onto the island and the barrage came down BEHIND them!
They had to retire through the "protective" barrage to rendezvous with
their replacements. It was winter and the Highlanders were wearing
their greatcoats. In the semi-darkness of the dawn, the advancing
Maisonneuve mistook the retiring Highlanders as a German attack. One
of the men I took into my unit later told me that as he was emerging
from the smoke of the barrage, he found himself facing troops with
fixed bayonets attacking him! There it was; darkness, smoke, language
differences, troops in unexpected places. In a split second he had to
decide: is it going to be him or me? Him! So he opened up with his
Sten gun. Canadians killing Canadians!
Life had to go on, and so did the war. When these men, all
volunteers, were signing-up they did so for 'the duration.' There was
no resigning or quitting; you were in it until you were dead,
crippled, or until, in some unforeseeable future event, the war was
won (or lost!) There was one slim chance of an out - if you had been
wounded three times you could elect to go home to Canada for thirty
days; but who could have stood the thought of coming back to Europe?
Nobody!... so nobody I knew took advantage of this option.
 It is painful to study the big military picture leading up to the very
desperate frontal assault on Walcheren by the 2nd Division's 5th
Brigade, primarily the Regiment de Maisonneuve and the Calgary
Highlanders. Painful because it seems clear that its purpose was
diversionary: to draw onto themselves enemy forces and fire which
otherwise would have been available to the German 70th Infantry
Division to oppose the landings by the British 52nd Lowland Division
and various British Commando Units. It is painful to study the big military picture leading up to the very
desperate frontal assault on Walcheren by the 2nd Division's 5th
Brigade, primarily the Regiment de Maisonneuve and the Calgary
Highlanders. Painful because it seems clear that its purpose was
diversionary: to draw onto themselves enemy forces and fire which
otherwise would have been available to the German 70th Infantry
Division to oppose the landings by the British 52nd Lowland Division
and various British Commando Units.
As the
storming of the Sloe Causeway got stuck the diversionary operation
"Mallard" was carried out, crossing the Sloe by wading and storm
boats. Here (photo opposite) you see German POWs and wounded brought
back. Storm boats can be seen in the background.
To gain access to the Port of Antwerp was essential to the further
success of Shaef operations and as the Brigadier said (at an "O" Group
meeting of all senior officers of the 5th Brigade, who were
questioning General Simonds' determination to proceed with such an
obviously difficult and potentially costly operation) the risk
had been thoroughly evaluated, and in view of the larger military
picture, had been considered acceptable. I have seen figures which
show Highlander casualties as 63, of which 17 were killed.
The Dutch people recently showed their sincere gratitude for what the
Canadian Army did for them. At an anniversary commemoration service,
for the Walcheren action, the King (or Crown Prince) of Holland spoke
these gracious words:
Thank you Canada!
Thank you Canadians, from the bottom of our hearts!'
Personal memories of Pete
I
was a telegraphist or 'sparker' in the Walcheren
(Westkapelle) landing as part of a Forward Observation Unit for naval
gunfire. Each unit consisted of an Artillery Captain known as the FOB (forward
observer bombardment), his bombardier and three naval
telegraphists carrying backpack radios. When the bombarding ships opened fire
the FOB and his bombadier plotted the fall of
the shot and calculated corrections which we transmitted by
Morse code to the ships. We trained in an area about 9 miles east of
Ostend since the extensive sand dunes and scrub-land
were similar to parts of Walcheren. Our unit was
housed in modern buildings in what may have been a
holiday area.
We were attached to the Marine Commandos and trained with them.
They were very professional and disciplined. On
the eve of the operation, they
paraded in the morning with their webbing scrubbed,
then paraded later in the day
with their webbing 'blancoed'
to the correct shade of khaki! To cap it all
they marched the nine miles to Ostend to embark when other
units were carried in vehicles.
Our unit
was allocated a small amphibious vehicle called
a Weasel to disembark with our equipment onto the
beach at Westkapelle. When we boarded
our Landing Craft Tank (LCT) at Ostend we found the
Weasels arranged in a line along each side of the tank deck with the much larger
and heavier amphibious Buffalos in the centre line between them.
The
Buffalos were partially
armoured and could carry several men and cargo. This particular
arrangement of Weasels and Buffalos later proved to
have life and death implications.
 We sailed late in the day on October 31st 1944 to make the fairly short voyage
to Walcheren. During the night there were rumours that we were passing enemy
coastal batteries but I believe that the Canadians had
put them out of action. In any event they gave us no trouble. We
were due to land with a follow up wave and so were a mile or two behind the
main
assault craft and troops. However, any
thoughts that this would make for a 'cushy' landing were soon dispelled. We sailed late in the day on October 31st 1944 to make the fairly short voyage
to Walcheren. During the night there were rumours that we were passing enemy
coastal batteries but I believe that the Canadians had
put them out of action. In any event they gave us no trouble. We
were due to land with a follow up wave and so were a mile or two behind the
main
assault craft and troops. However, any
thoughts that this would make for a 'cushy' landing were soon dispelled.
[Photo; Taken close to the Marine Commandos coming
down from the Westkapelle beachhead. This image shows German prisoners in a
Prisoner of War cage. © IWM (BU 1280)].
We watched as LCG(L)s and LCG(M)s, fitted with
guns,
closed in to slog it out with the German coastal batteries
ensconced in massive gun emplacements. It was a
David and Goliath contest of massive proportions.
The bold actions of the landing craft
were designed to keep the German
batteries busy while the Commandos
made for the shore.
Even from the distance it was easy to see that these little
gun-ships were being pounded but they didn't
falter. Their losses were,
however, very heavy.
An
LCT(R) rocket craft fired a salvo but it fell short
amongst allied
craft in forward positions. It looked like mayhem but
I believe the losses, though bad,
were less severe than they
appeared to us. As we
watched the flashes from the German batteries we felt disappointment, and
a degree of frustration, that our usual air cover was not
present. It later transpired that flights were delayed by
fog over the airfields. Nevertheless fighter bombers did eventually join
the fray by
attacking the German
defences.
All this time we were making slow but steady progress towards
the shore at the back of a short line of landing craft. Our attention was
grabbed when the craft ahead of us was
bracketed and hit by shell fire. Soon shells fell
abeam of us as our position, direction and speed were plotted by the
enemy gunners.
I began to climb back into our Weasel for protection
and had one foot on the guard rail
around the LCT when we were hit. The shell fell into
the Buffalo parked alongside our
Weasel. Sadly
Canadian engineers with
packs of explosives were inside....
and we had been
chatting with them just a short time
earlier. The resultant explosion was contained by the Buffalo which went up in a
sheet of flame and saved our Weasel from the worst of
the explosion. I was blown onto the catwalk which ran
around the LCT. Some men
jumped overboard and were
carried away on the tide but were
recovered by rescue craft.
I made my way to the stern of the craft where the bridge structure provided some
shelter from the burning and exploding vehicle. Soon a Buffalo
came alongside and took some of us ashore. We headed
for the south side of the gap which had been blown in
the sea walls (dykes). On
shore vehicles were burning, filling the air with black smoke. Wreckage
was strewn about all over the place.
Bomber Command had earlier breached the dykes and the
interior of the island was flooded. Small areas of higher ground were
sticking out of the water but Westkapelle village
itself was badly inundated.
The flooding on the southern side of the gap contained
the fighting to a very narrow front only a few hundred yards
wide. It was along this narrow strip of dry land that the Commandos
faced
massive gun emplacements and land
mines.
Around this time one of our FOBs and his sparker were
wounded by a mortar bomb. The
Medical Officer (M.O) was treating
them in the crater when a second bomb killed them all. This disproved the old
adage about two bombs not falling on the same spot.
That first night enemy star shells lit up the landing area. Shortly
after a Buffalo evacuating casualties made its
way across the beach and ran over a mine. It
immediately blew up. I will forever remember
the desperate
cries for help from within. The driver and his mate jumped out burning as
they ran to the sea. It was a truly hellish
scene made all the worse by the bright flames glowing in the darkness.
Naval supporting fire was good. Our units were able to direct the fire of heavy
ships such as the Warspite and the Monitors
Erebus and
Roberts.
The fighting is documented elsewhere but I would like to comment on the spirited
manner in which the Commandos took on the massive German emplacements with
comparatively
light weapons.
When we reached Zouteland, a little village down the
coast from Westkapelle, we could clearly see the damage we had caused.
Compared to Caen it was nothing but to the local population
the devastation caused by 15 inch
shells was frightening. Despite this the
inhabitants were wonderfully welcoming and some of the
women wore traditional dress. One
Dutchman
watched the landing in progress despite the obvious
dangers!
Our side
on the south of the gap was
cleared in a few days and having reached the
gap before Flushing our part in the assault
was over. We spent some
uncomfortable days in a hollow scooped out in the sand with a roof of corrugated
iron sheets to keep us dry and relatively safe. Just a
few yards away the medics had piled up corpses wrapped in corrugated cardboard
bound with string. They were stacked, I have to say, in
criss-cross fashion like
firewood. It made me think of the cheapness of human life in war
conditions. Some German prisoners were nearby
in a crater surrounded by barbed wire. They had little
shelter and food and they were distinctly unhappy.
In reality
their conditions were not very different from our own.
After eight days an LCM took us off the island. The vagaries of war had one more
unpleasant surprise for us. The voyage back to Ostend passed
through an exceptionally violent storm. The skipper
feared for the safety of his vessel and most of the
troops were violently ill. I stayed on deck and
remember one soldier lying face down on the very edge of the craft gradually
sliding overboard and apparently not caring. I grabbed his webbing and pulled
him back inboard.
As we approached Ostend an air raid was in progress with flak sailing into
the sky. The skipper and his bridge party failed to
notice a destroyer signalling an Aldiss lamp challenge
to 'unknown vessel.' Luckily we understood
Morse code and alerted the bridge party.
The destroyer might well have opened fire as
our craft bore some resemblance to a high speed German
motor boat.
Our first night ashore was spent in a German barracks decorated with murals of
Storm Troopers. They bore little resemblance to the dejected prisoners occupying
the crater on Walcheren! Finally back to the training
area and the large dormitory we had occupied there. It was sad to see many beds
stripped down because their former occupants would not be
returning. Sad also to find that many of our possessions had gone missing in our
absence.
I sometimes wonder why, in
my recollections, D-Day seemed more exciting
and important than Walcheren. Perhaps the reasons are self evident.
Walcheren was a landing in bleak November on the shores of the North Sea. It was
a necessary and important operation in its own
right but
D-Day was, in the mind of a young impressionable soldier, the
battle
to liberate Europe.
Further Reading
Websites
1. Elsewhere
on this website, read about: LCT 979,
which, against all the odds, came through the operation severely
battered but not broken; LCT 980 which, in part,
includes Walcheren and the
Landing Craft
Support Squadron page which includes a description of the action
of LCGs, LCFs and LCT (R)s which drew enemy heavy gunfire off the
landing Royal Marines onto the landing craft.
2.
German coastal defences on
this Walcheren website with a printable list of English translations
of selected words. Many interesting photographs.
3. http://www.lawlerbrown.com/
(Copy & Paste this link for memories of a soldier who saw service on Walcheren.)
Books
There are around 300 books listed on
our 'Combined Operations Books' page. They, or any
other books you know about, can be purchased on-line from the
Advanced Book Exchange (ABE). Their search banner link, on our 'Books' page, checks the shelves of
thousands of book shops world-wide. Just type in, or copy and paste the
title of your choice, or use the 'keyword' box for book suggestions.
There's no obligation to buy, no registration and no passwords.
Turning the Key; the Capture and Liberation of Walcheren Island October 30 -
November 8, 1944 by Paul M Crucq. 320 pages, maps, photos, bibliog. ISBN/EAN
978-90-807854-4-1.
Hoofprints
in the Clouds - Jeep Tracks in the Mud by
Geoffrey Tudor.
An account
of how a group of men came together in Scotland in the late summer of
1943 to form a new mountain battery. Geoffrey Tudor relays his
World War II experiences as 'Graham Turner', a second lieutenant with
the 1st Mountain Regiment, Royal Artillery. With the formation of 474
Mountain Battery and their initial training in the Scottish mountains,
the gunners then cross the Channel to the floods of Holland and
through bloody conflicts in northern Germany. Pen Press Publishers, 15
Nov 2008. Paperback 272 Pages. ISBN: 1906206325.
Mountain and Flood - The History of
the 52nd (Lowland) Division by George Blake, published by Jackson,
Son and Company, Glasgow 1950.
They did what was asked of them,
by Raymond Mitchell. Pub by Firebird Books, 1996. ISBN 1 85314 205 O
History of 41 [Royal Marine] Commando - the book covers the period
1942-1946, but has a detailed chapter on 41's role in the invasion of
Walcheren.
In the Shadow of Arnhem by Ken
Tout. xiv, 242 pages and 42 illustrations. Published by Sutton
Publishing Ltd., Phoenix Mill, Thrupp, Stroud, Gloucester GL5 2BU
England. ISBN 0-7509-2821-2
Ken's book is
published in English. The subtitle is: The battle for the Lower
Maas, September-November 1944. Chapters 7 and 8 are about province
Zeeland and most about Walcheren and South Beveland. Chapter 7
begins at page 116 to page 133 and chapter 8 starts at page 134 and
ends at page 155. Jan H Wigard, Walcheran, Holland.
Battle
for Antwerp; the liberation of the city and the opening of the Scheldt
by J L Moulton. 1944 (London, Ian Allan, 1978) ISBN 0-7110-0769-1.
Tug of War - by W Denis Whitaker DSO. Pub 1984. ISBN
0-8253-0257-9. This Canadian author saw service at Dieppe and
Walcheren. The book contains good detailed information on the
Walcheren Causeway fight.
Battalion of Heroes:
the Calgary Highlanders in World War II
by David Bercusson. Pub by The Calgary Highlanders Regimental Funds
Foundation 1994. ISBN 0-9694616-1-5.
Cinderella Operation by General Rawling. Pub by Cassell Ltd
The Eighty Five Days - The Story of the Battle of the Scheldt
by R W Thompson. Pub by Hutchinson of London.
From Omaha to the Scheldt - the story of 47 Royal Marine Commando
by John Forfar. Pub by Tuchwell Press Dec 2001. ISBN 1 86232 149 3.
300 pages with around 150 B&W illustrations and maps. John Forfar was
the Senior Medical Officer attached to 47 RM Commando. For his heroism
at Walcheren he was awarded the Military Cross.
Operation Neptune by Commander
Kenneth Edwards R.N. Published by Collins in 1946.The book covers the
naval side of the North West Europe campaign including Commando
actions such as Walcheren.
Le Jour J au Commando N° 4 by René Goujon (French
Kieffer Commando), published by Editions Nel 1, rue Palatine, 75006
Paris tel 00 33 1 43 54 77 42. Enquiries in English to the author's daughter
at armoria.d.ylfan@hotmail.fr
Drijvende kolossen voor vrede en veiligheid;
het gbruik van Phoenix-caissons bij dijkherstel in Zeeland, 1945-1953" by
Cor Heijkoop 2002 publisher: Stichting Caissons Ouwerkerk/Museum Watersnood
1953. (Translation - Floating Colossuses for peace and freedom, the use of
Phoenix caissons in dyke repairs in Zeeland 1945-1953) 104p. A book on the use
of the Phoenix-caissons (first used for the Mulberry Harbour) in the province of
Zeeland.
The Fighting Fourth - No 4 Commando at War
1940-1945 by James Dunning. Sutton Publishing Ltd, 2003. ISBN 0750930950
(Chapter 10).
48 Royal Marine Commando, The story 1944-46. Published privately in
1946.
D-Day Commando, From Normandy to the Maas with 48 Royal Marine Commando.
Written by Ken Ford and published(2003) by: Sutton Publishing Limited. ISBN
)-7509-3023-3.
Commandos and Rangers of World War 2
by James D. Ladd. Pub in 1978 by MacDonald & Jane's. ISBN 0 356 08432 9.
Commandos 1940 - 1946 by Charles Messenger. Pub by William Kimber, London
1985. ISBN 0 7183 0553 1.
The Watery Maze by Bernard Fergusson pub 1961 by Collins.
Codename 'NELLY'; British Radar Units on
Walcheren and in Flanders. Defence of the Scheldt estuary, December 1944 - May
1945 by
Paul M.
Crucq
Illustrations and photographs, detailed interviews; limited edition, 80 pages
and over 100 illustrations. Subjects
are: RAF mobile Radar defence at De Haan, Blankenberge [both in Belgium],
"Nelly" at Westkapelle and "Paddy" at Oostkapelle {both in Walcheren}.
Publication date Oct 2004 Price: 28 Euro.
The author writes;
On the 1st of November 1944 at Westkapelle a technical officer of the RAF
landed. His mission was to find out if the (Westkapelle) lighthouse was suitable
for the installation of "NELLY" the codename of a portable, experimental plane
radar especially developed for this aim. At the beginning of December "Nelly"
came to Westkapelle and was raised at the lighthouse till June 1945. The project
was shrouded in the greatest secrecy and that is the reason why "Nelly" has
never been mentioned before in Walcheren history.
Battle Ground Europe Guide to
Walcheren by Andrew Rawson. Published by Pen and Sword, 47 Church
Street, Barnsley. Fully illustrated with maps and photographs the book
charts the planning and execution of Operations Infatuate I and II.
The final section deals with visiting the island. 144 pages, 120
illustrations (75 wartime photos, 25 modern and twenty maps). ISBN
number is 0850529611. Available through Amazon, the Pen and Sword
website or direct from the publishers. The author is happy to answer
questions about the book and can be contacted at
rawsonandrew@hotmail.com
The three books immediately below are written in
the English and can be ordered from the author
Mr. Paul Crucq,
President Rooseveltlaan 186,
4382 KX Vlissingen,
Netherlands.
Phone +31 118-414402
Aiming Point Walcheren; the bombardment of gun
emplacements and strong points Walcheren island, October 1944 by
Paul M.
Crucq, published
Vlissingen, 2003. 207 pages; illustrations;
abbreviations, bibliography; bomb expenditure.
ISBN 90-807854-1-5
We never blamed the crews; the flooding of
Walcheren island, October 1944, published
Vlissingen, 2000. 209 pages,
illustrations; battle orders, bomb expenditure, bibliography.
* Illustration: situations, maps, aerial
picture, persons.
Correspondence
.jpg) Geoff, Geoff,
My wife’s father, Roy Grant,
is 94 and has lived for most of his life in the village of Odstock in Wiltshire,
England.
[Photo; Roy Grant (right) with comrade in arms
Jock].
He was called up late due to
being an apprentice and joined the Hampshire’s, and after some fighting in
Italy, he volunteered for the commandos. He successfully completed their arduous
training at the Commando Training Centre, Achnacarry in the Scottish Highlands
joining the ranks of No 4 Commando. He often reminisces about his time in the
highlands, running up Ben Nevis's 4412 feet before breakfast!
We don’t get much information
from him about his part in the raid on Flushing except that he was in HQ troop,
so I assume he provided protection for the HQ officers and their supporting
staff. He was billeted in the town of Kortgene with a family and later named his
house after the town. He was involved in a raid on an island north of Walcheren,
which may have been North Bevelan.
_small.jpg) As
No 4 Commando was in the process of running down their numbers after Walcheren,
he returned to the UK and joined No 6 commando who were destined for the Far
East. The plans changed dramatically when Japan surrendered as a result of the
atomic bombs dropped on Hiroshima and Nagasaki. Roy was subsequently sent to
Palestine and was demobbed in 1946/47. As
No 4 Commando was in the process of running down their numbers after Walcheren,
he returned to the UK and joined No 6 commando who were destined for the Far
East. The plans changed dramatically when Japan surrendered as a result of the
atomic bombs dropped on Hiroshima and Nagasaki. Roy was subsequently sent to
Palestine and was demobbed in 1946/47.
We attended the drumhead
ceremony at Portsmouth to stand down the Commandos when he was interviewed by a
'BBC South Today' reporter. He complained bitterly that it was easier to face
the enemy's machinegun fire, than speak to the BBC!!
He is a life time member of
the Commando Association and has remained friends with a comrade in arms by the
name of Jock. He attended the ceremony at Westminster Abbey when the Queen
Mother was presented with the colours and we visited Walcheren for the 60th
anniversary commemorations. We're hoping to attend the 75th anniversary
commemorations in November 2019.
Kind regards,
Jerry Henderson
Support Squadron Eastern Flank (SSEF)
I've compiled a list of craft in support of operations on the eastern
flank of Operation Infatuate. My main source was the Admiralty's 'Green List'
which gives the
disposition of landing craft on particular dates. It suggests that LCG(L) 1, 9, 10 & 11
were at HMS Squid in need of repair the night before Operation
Infatuate, but it's known that LCG(L) 1was lost in the
action.
If we include these
4 LCG(L)s, the tally concurs with the recollections of
Richard Blyth; BBC
- WW2 People's War - Battle of Walcheren who recalls that the
"battle of Walcheren SSEF consisted of 6 LGGs and 2 LCGs,
6 LCFs, 6 LCSs and five rocket craft, a force of 25 craft". However,
Basil Woolfe suggests 27 craft were in the SSEF that
day, but he may have included the two command ships, LCH 269 and LCH 98; BBC
- WW2 People's War - SSEF and the Battle for Walcheren Island. (Part 1).
I've prepared a table in the form of a
pdf
file. It doesn't claim to be definitive but it may be of interest to some
visitors to this web page.
Best wishes
Steve Birkinshaw
70th Anniversary 'Thank You Canada' Liberation Parade, 2015, Toronto, Canada.
Hi Geoff
  As Chairman of the St Patrick's Day Parade Society, I was approached
by representatives of the Dutch people looking for help in arranging a 70th
anniversary "Thank you Canada" liberation parade. Its
purpose was to publicly acknowledge and commemorate Canada's vital
contribution to the liberation of Holland towards the end of WW2 and
to remember those who did not return home. As Chairman of the St Patrick's Day Parade Society, I was approached
by representatives of the Dutch people looking for help in arranging a 70th
anniversary "Thank you Canada" liberation parade. Its
purpose was to publicly acknowledge and commemorate Canada's vital
contribution to the liberation of Holland towards the end of WW2 and
to remember those who did not return home.
  We were more than happy to support such a worthy cause and soon set
the wheels in motion. On the day, veterans, with their families and
friends, representatives of the Dutch people and the wider Canadian
community, watched the parade roll down the streets of Toronto. It was
amazing to see a Sherman tank and other WW2 military vehicles so
evocative of the era. The parade was a tremendous success with up 400,
000 on the parade route. We were more than happy to support such a worthy cause and soon set
the wheels in motion. On the day, veterans, with their families and
friends, representatives of the Dutch people and the wider Canadian
community, watched the parade roll down the streets of Toronto. It was
amazing to see a Sherman tank and other WW2 military vehicles so
evocative of the era. The parade was a tremendous success with up 400,
000 on the parade route. 
The small selection of photos below give
a sense of what was a most memorable day. [Photos courtesy of
Katharine Burton].
 Alan Louthe Alan Louthe
Chair
St. Patrick's Day Parade Society
The Taking of General
Daser's HQ Flag.
Hi Geoff,
I am a retired History teacher with a hobby
of collecting militaria. At the moment I have been working through some items to
sort out their history for recording purposes and was looking for some images of
General Daser when your site popped up so I thought you may be interested in one
item I have.
In the year 2000 I obtained from an ex
member of a co 7/9th Royal Scots, Walter Rowland- see his photo, (
then living in Woy Woy on the Central Coast of NSW just north of Sydney Aust),
the War flag that had been flying over General Daser’s headquarters. Walter
wrote down some brief details concerning the flag which I include below.
Hope the info is of some interest,
Regards
Mark Hansen in Oz
 THE
TAKING OF THE FLAG IN HOLLAND IN 1944 THE
TAKING OF THE FLAG IN HOLLAND IN 1944
The allies needed a port
to bring in supplies in large numbers. They had captured the Port of Antwerp but
could not use it until the islands at the mouth of the Scheldt estuary were
captured. This task was given to the 52nd Scottish Division under the
command of General Hakkewell-Smith. It should also be noted that the division
had many other units attached to it. ‘i.e.’ commandos and many Dutch and
Canadian units.
The 7/9th Royal
Scots were given the task of taking Flushing. The headquarters in town was the
Hotel Britannia, after some fierce fighting it was captured where Colonel
Rheinhard the Commanding officer in Flushing surrended. 600 prisoners were
taken.
A Coy 7/9th
Royal Scots in which I was a Cpl were given orders to take the town of
Middleburg the HQ of the German Commander General Daser. He said he would only
surrender to a Colonel. The Coy Commander of A Coy was Major H Johnstone so he
promoted himself to a Colonel by putting another pip on his shoulder. He also
took the surrender of 2000 prisoners.
Myself and mate Bob
Dryburgh took the flag from the two German soldiers as they were lowering it.
Major Johnstone was decorated with the Dutch Silver Cross He died in South
Africa a few years ago. Bob Dryburgh died tragically in 1989
Signed
Walter Steane Rowland,
3056413 ex Cpl “A” Coy 7/9th Royal Scots 1939-45
10/12/00”
Norwegian Commandos
Dear Geoff,
I have read several times
your website regarding the Operation Infatuate with great interest. Many thanks
for a great site!
I graduated from the
Norwegian Military Academy Krigsskolen in 1982 and are now a major (r). I "left"
the army in 1990 for a civilian career but came back in Feb 2010 in an civilian
position. I have a great interest in history as a general and military history
especially. I was only a young boy when I first read about the No. 5 Norwegian
Troop of 10A and their effort in this Operation Infatuate. One of the Norwegian
Officers wrote a book, called "Groenne Djevler" ("Green Devils") about his
service during WWII.
When the No 5 Nor Troop came
back to Norway May 9th 1945 they got the task to protect the Royal Castle and
our Crown Prince Olav, together with forces from the Norwegain Independent
Company No.1/SOE (NORCIC 1) the "Kompani Linge" (known from Operation: "
Claymore, Antrum, Arquebus, Kitbag, Archer, Anklet, Archery, Cheese, Lark,
Anchor, Anvil, Cockerei, Grebe, Mallard, Penguin, Raven, Heron, Swan, Musketoon,
Kesterel, Gannet, Carhampton, Chaffinch, Seagull, Martin Red, Vestige I,
Company, Lapwing, Woodpecker, Swallow, Grouse, Gunnerside, Delfin, Sunshine",
etc, etc.
Operation Gunnerside:
UK National Archive.
Until the Kings Guard was
re-established in 1945, the No 5 Troop together with other picked units guarded
the King and his family. Some of the men from this unit was the basis for the
new Kings Guard.
Only some days ago the Dutch
Government saluted the only 4 still alive of the Norwegian Walcheren Veterans
with the Dutch "Ridder in de Orde van Oranje-Nassau" in a ceremony held here in
Oslo.
Kind regards,
Ole-Bernt Wivesoll
Adviser/Team leader
Norwegian Defence Staff
263 Squadron.
My mother's cousin, F/Lt D. J. Turner,
flew his first Op with 263 Squadron flying Typhoons operating from B70
Deurne to attack the German radar installation at Walcheren on
29-10-1944. Take off was at 16:22 hrs and he landed back at base at
17:22 hrs. The attack must have been around dusk. The Squadron
attacked with cannon and strikes were seen on target by the pilots.
F/Lt Turner was subsequently killed in action on 26-12-1944 over
Windesheim in occupied Holland whilst engaged in an interdiction on
the Zwolle to Deventer railway line. I enjoyed your very useful and
informative site. Hope this information is of some interest to your
readers. (Chris Aspinwall).
 52nd
Lowland Division Remembered - Operation Mallard 3rd of October 1944.
On
the 6th of October 2008 a new industrial railway line, constructed
by the Dutch railway company Pro Rail, was officially opened between
Walcheren and South Beveland / Netherlands near the Sloedam
causeway. The route included a viaduct across the A 58 motorway and,
on my suggestion, it was given the name MALLARD VIADUCT. 52nd
Lowland Division Remembered - Operation Mallard 3rd of October 1944.
On
the 6th of October 2008 a new industrial railway line, constructed
by the Dutch railway company Pro Rail, was officially opened between
Walcheren and South Beveland / Netherlands near the Sloedam
causeway. The route included a viaduct across the A 58 motorway and,
on my suggestion, it was given the name MALLARD VIADUCT.
As the
battle for the Sloedam Causeway by the exhausted Canadian 5th Brigade failed,
the 52nd Lowland Division made a very difficult 750 yard crossing (see
map) partly in boats and partly by wading through very muddy salting. The
operation was codenamed Operation Mallard and the naming of the viaduct
provides a lasting remembrance of this decisive operation for the Sloedam
Causeway which, sadly, is almost forgotten at the annual remembrance
ceremonies in early November each year.
For many
decades to come travellers along the A58 will see the name and will remember
what happened in WW2 or will be motivated to ask why the viaduct was so named.
It is also my way to honour the Scottish victims and all the men who fought
and ended the crossing so successfully. With great respect Pro Rail
constructed an excellent view-point over the former Mallard area, which is now
an industrial area.
4334 HK
Middelburg-Netherlands
26 (Army
Co-operation) Squadron RAF
I thought you might be
interested to know that 26 (Army Co-operation) Squadron has Walcheren (3-10 to
19-11-1944) as one of its Battle Honours and the word 'Walcheren' is emblazoned
on the Squadron Standard. The task of the Squadron was to spot the fall of shot
from the various battleships taking part and to direct fire. This required the
pilots to fly at very low level for sustained periods which was of course very
dangerous. Precise casualties resulting from this operation are not known but
were believed to be high. (M Roberts)
Frank Nightingale
& George Martin 41 RM Commando.
I have been trying to find two old friends who were in y troop 41 RM
CDO. To my delight I found a picture of them on your website it showed
them (operation Infatuate at Weskapelle) on 4th November 1944 just
before they went into action the next day at Domberg. Frank
Nightingale is in the middle of the picture (he went on to win the DCM
the next day) and behind him George Martin. I wonder if they are still
with us and if they made the 60th reunion. My name then was Violet
Millross. Are there going to any pictures of the 60th reunion on the
website?
violetjenkins@onetel.com
(also on notice board).
New Museum.
I've just been to Westkapelle to follow my father's footsteps. There
is a new museum opening on the anniversary day 1st November 2004.
They are requesting any information from formers troops involved or
anyone with detailed stories of those involved so that they can be
featured. I have sent details of my Dad who was on LCG 1 commanded
by Lt A.H.Ballard but I have no other information on this ship or
commander other than she sank that day. The address to send memoirs
to is: Stichting Polderhuis, mw A. Van Hoof, Julianastraat 19, 4361
EA Westkapelle, Walcheren.
Acknowledgements
Based
on an article by James Paul with contributions by J N (Hans)
Houterman and Lt. William J Smith of the Calgary
Highlanders.
|


.jpg)
.JPG)
.jpg)
.JPG)
.JPG)

.jpg)


